Over five years ago, one of my early blog posts was titled "Au revoir Moonee Ponds, Hello Footscray". Now, with mixed feelings, we are saying goodbye to our sweet home in Footscray and moving on to something bigger in the nearby suburb of Yarraville.
Another of my very early blog posts, titled "A place to call my own" shared a photo of our place way back then. In that post I said something about imagining the house when we'd poured our souls and a coat of paint over it. I'm now confident we've done both so perhaps it really is the right time to bid farewell.
We've come a long way, baby! Parts of our journey in transforming this house into our home have been documented here so it seems only right to share the end of the road too. Throughout this post are the photos taken by our real estate agent, Jas Stephens. Most rooms have been shown here before, but these shots with their panned out, wide angles give you a slightly different view and show you some of the general improvements that I never shared. The external painting, new front garden and dark floor stain are the obvious examples.
A few notes on colours and suppliers...
Paint: Exterior walls are painted Haymes Silverado, windows are Dulux Vivid White, gutters, verandah posts and door are Ironstone (Colorbond), roof is Sonora Sea (also a Colorbond colour).
Deck: jarrah tongue and groove boards for a period look. Made by my very clever Mister and our carpenter friend, Yan.
Chairs: salvaged from my Grandad's shed and painted by moi
Path: bluestone pavers quarried locally in Victoria
Turf: King's Pride buffalo laid by aforementioned clever guy
Lacework: "Chantilly" powder coated aluminium by Chatterton's
Come inside...
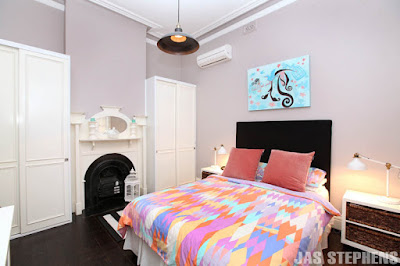
This is a view of the front hall inside the front door, looking into the living room and our bedroom. An old post on making an entrance shows some before shots of this space. Our bedroom hasn't featured a lot on the blog, perhaps because it started as the nicest room when we bought and we never painted it! We did swap the mauve damask curtains and lace for something simpler, replaced the dated light fitting, stained the floors and installed a split system.
Leo's nursery has popped up a few times, most recently here. It's one of my favourite rooms and gets the best afternoon light. I'm so excited that it will soon appear in Little One magazine! It was our guest room BB (Before Baby). Do you remember this?
The living room is looking much better here than when it was covered in red brick dust. I don't miss that. Old posts here and here. And really old ones here, here, here.
For most of our time here, we've used the third bedroom as a study (see this old post on how we transformed this space with paint and this post for how it looked afterwards). When Leo arrived, we put a sofa bed in here for guests and installed the robes on either side (they were an awesome find on a 'buy, swap, sell' site on Facebook!). To sell, we put a proper spare bed in here rather than a sofa bed. On the day these photos were taken, I stapled fabric from Spotlight on a canvas to create some "art" for above the bed.
In the bathroom, we replaced tabs, doorknobs, the mirror and shower curtain (see details here) to make the space our own without major work.
I would have loved to replace the kitchen floor tiles and cabinets but just replacing the mixer tap (is it a faucet?!) and the door handles made a big difference to my enjoyment of the space.
I never blogged about it but one of my favourite changes in the kitchen was removing the timber venetian blinds and replacing with a white roller blind hidden behind a pelmet I had made (covered in black and white fabric from Ikea). We also painted over the tile strip in Dulux Domino and painted the walls on this side in Dulux Whisper White.
We also went Domino crazy over the other side of this room in the dining area. The dark colour makes a gorgeous, intimate space for a dinner party. As you can see, I never got around to sanding the inside of the French door in order to paint it (so much to do, so little time!).
For most of our time here, we've used the third bedroom as a study (see this old post on how we transformed this space with paint and this post for how it looked afterwards). When Leo arrived, we put a sofa bed in here for guests and installed the robes on either side (they were an awesome find on a 'buy, swap, sell' site on Facebook!). To sell, we put a proper spare bed in here rather than a sofa bed. On the day these photos were taken, I stapled fabric from Spotlight on a canvas to create some "art" for above the bed.
I would have loved to replace the kitchen floor tiles and cabinets but just replacing the mixer tap (is it a faucet?!) and the door handles made a big difference to my enjoyment of the space.
I never blogged about it but one of my favourite changes in the kitchen was removing the timber venetian blinds and replacing with a white roller blind hidden behind a pelmet I had made (covered in black and white fabric from Ikea). We also painted over the tile strip in Dulux Domino and painted the walls on this side in Dulux Whisper White.
We also went Domino crazy over the other side of this room in the dining area. The dark colour makes a gorgeous, intimate space for a dinner party. As you can see, I never got around to sanding the inside of the French door in order to paint it (so much to do, so little time!).
The first bit of work on this space is documented here. Of course, we did the floor boards after this time (LOVE black Japan floors!). You also get a glimpse in this post on the kitchen dresser.
Here's our tiny back yard and one of our biggest reasons for moving. The little man needs some grass! Good news is that our new abode has that in abundance.
Here's our tiny back yard and one of our biggest reasons for moving. The little man needs some grass! Good news is that our new abode has that in abundance.
So there you have it, a glimpse into our little home, sweet, home. It has blessed us with five good years and I will miss it dearly. Six weeks after settlement, our second bundle of joy is due! So times are a'changin' and new pastures are calling. Our new place is in dire need of some love which means starting over. This time we will have the space to create a forever home if it feels right.
So where are we going?!
So where are we going?!
Initially we had hoped to find a new place closer to home in West Footscray, but it wasn't to be. I feel a sense of trepidation moving suburbs. Rather silly since Yarraville is about 3 kilometres away and a lovely place to live, by all accounts! I love my home though, and I love the little WeFo community. In the days following the auction of our new place, my mind filled with the things I'd miss. The funniest things, like not being so close to Sims, our local independent supermarket, where we bump into Rodney. He's lived in the same house on Barkly Street all his life and is spending his later years strolling between Sims and the cafes and shops of West Footscray. Sometimes he calls Leo "Leon" but so what?! Back in December we bumped into him at the local medical clinic when Leo hurt his leg and only recently has Rodney stopped asking how it's going. Bless him. I'm also coming to terms with being further from Leo's child care centre (until we get into the one in Yarraville which could be a year or two) and not being able to walk 100 metres to my hairdresser! Of course, there are going to be so many wonderful new things to discover in our new 'hood but I have to have my little grieving period.
P.S I know I have committed the immortal blogging sin of going AWOL for far, far too long. I do apologise. I have thought of you, dear bloggy and dear reader, so much in this time but just never managed to put finger to keyboard. Shocking and ridiculous I know. I'm working on making time for things I love but it ain't easy, as I'm sure you all know. Motherhood is a consuming beast, as is life itself! If you're not careful, it sucks you in and suddenly another year has flashed by. I want to promise that I will stop picking up the endless trail of toys and fussing over the next meal in order to write another post pronto... but I'd hate to break a promise! Until next time, take care and just do things that make your little heart sing :)


