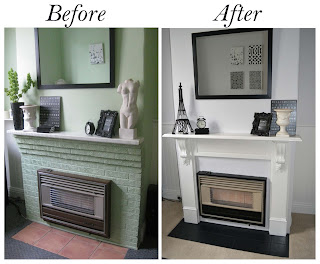
Bring out the trumpets people. Our living room makeover is now complete! It has been a very busy month around here but it's DONE. I won't lie, it has been tiring, often boring and very dirty but doing every single thing ourselves apart from installing the carpet has been satisfying too. The biggest job in the room was revamping our fireplace and mantle so this post is dedicated to that particular six-week slog.
In this earlier post, I showed you what we started with and our first steps plus finding and painting a mantle. Here are a few earlier pics for a quick recap.
After knocking out the bricks, some of the big holes were filled by replacing broken brick and covering with mortar. After leaving this to dry for a day, a coat of render was applied (below).
The render was then hand sanded smooth (below).
A coat of base coat plaster (below) was followed by a final coat plaster to give it a smooth finish.
Each layer needed a day to dry. This is what we ended up with after the final coat plaster.
At this point, our little old heater was looking worse and worse, although it was still doing a fine job of keeping us warm as you can see. We figured it couldn't hurt to try spray painting the brown woodgrain veneer using the black White Knight spray can we'd used on the chandelier.
After taping carefully, the Mister sprayed away et voila! A new lease on life for this old boy.
Tiling was next on the agenda but first we had to fix the surface beneath the old tiles. You can see we exposed a crazy mix of different wood under there so it had to go.
I got brave and used the circular saw to cut this piece of flooring, then screwed it down.
Next to go down was a piece of cement sheeting and some aluminium tile edge was measured up. A fair amount of YouTube tutorials were also viewed around this time! Who needs a tradie when you have your own two hands and YouTube :)
The Mister was busy replacing flooring in other parts of the room and fixing squeaky boards so I had to get on and lay some tiles. When a deadline is looming, it's amazing what you will just get on and do. The carpet was due to be installed three days later so what could I do but smear down some tile adhesive, shimmy a few tiles in place and push some spacers down? Apart from a scary moment near the end where I momentarily thought my careful measurements were off, it was too easy.
Grouting the next night was the real challenge. We'd purchased ready made black grout in a tube and it seemed to get dry quickly and feel like it was setting before I could smooth it nicely between each tile. I may or may not have sworn at my husband in a state of stress! But I just kept smoothing it down as best I could then used a damp sponge a lot to get a nicer finish. By the time I fell into bed at 1.30am, I was feeling better about it.
In the morning, I saw this and felt rather pleased. After a bit of a clean up, I thought they looked a million bucks!
Later that morning, we had the carpet installed. It's a twist pile Godfrey Hirst carpet in a colour called Antique Linen. A few days later we drilled two holes into the chimney and inserted walls plugs and screws to hang the mantle. At some point we'll also reinforce the mantle with liquid nails. For now, we are just kicking back to admire it (and blog about it)!
Nothing better than a mantle to display beloved objects. I have already bought fabric to sew Christmas stockings that will hang on the mantlepiece! What a DIY nerd I have become.
Oh, so much better, don't you think? Those green patterned bricks are but a distant memory.


This comment has been removed by a blog administrator.
ReplyDeleteHi I was thinking of painting my old gas heater similar to yours, are you still happy with the result? I assume its not flaking off.
ReplyDeleteHi Roo, I am pleased to say that the paint looks exactly as it did when we painted it. The area that we painted gets warm but not too hot to touch so I think that has lessened the likelihood of it peeling. I really recommend trying it to give an old heater a new lease of life! Sure beats spending hundreds or thousands on a new one just for aesthetic reasons. Good luck!
Delete