Sunday, April 21, 2013

DIY nursery art

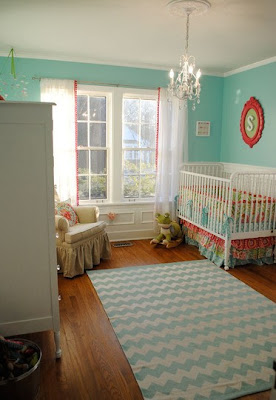
If you looked really closely at my last post on the rug for the baby's room, you may have noticed the colourful artworks I created to brighten the room and decorate one section of the very high, bare walls.


Let's get a little closer, shall we?


Doesn't seem quite close enough so let's break them down.


I've been collecting ideas for artworks or prints I thought I could create for awhile on Pinterest (check out my board here). The larger piece on the left was inspired by two things - Rachel Castle's embroidery artworks like this one:


And a DIY nursery artwork from the blog Aux petits oiseaux from which I borrowed the words. 


I had my mum mix up the colours for me, incorporating all the colours I am using (or plan to use) in the baby's room.  My mum is an artist so has a far better knack and confidence for mixing colours than I do (there is a glimpse of the abstract she did for our living room in this post and a photo of the piece she for my bedroom a few years back in this post).


I used her colours to paint strips of each colour on white cardboard. After two coats and some drying time, I lightly pencilled on the letters required to write 'every day we love you' in lower case and the French translation 'tous les jours nous t'aimons' in capitals. I wasn't worried about creating perfect letters as the aim was to create something with a child-like sense of fun. After cutting out each letter, I used clear craft glue to stick them onto white card and popped this into a white frame from a local variety store for $15. I used the same cut-out method for the dot artwork too and a smaller version of the same frame (about $11 for this one). Rachel Castle's screen printed dot artworks inspired this design.


The final piece in this little cluster is a ampersand design found on Google images (unfortunately I don't have the exact source as I printed it many months ago). I simply cut out the printed ampersand, traced around it with pencil straight onto a thin canvas I had in the cupboard (probably from a $2 shop) and filled it in with some of the leftover aqua paint used in the other pieces.


Next up are some silhouettes I tackled with my mum. We spent an enjoyable couple of hours one afternoon at my dining table surrounded by paper and paints. I showed her these animal prints by Me and Amber....


Before I knew it, she had created these beauties: 


They are just hanging out under the red lamp for now until I get around to hanging them. So cute!


Meanwhile I was stencilling and cutting out deers to create this:


For now, this one sits atop a set of Expedit shelves in the room with a framed image from a Typo calendar (middle) and a painting by my little friend Sophie (on the right). 


I love the colours in the ferris wheel. Isn't it brilliant that you can create artworks from images that grab your eye in everyday items? Calendars are great for this.


The same calendar also has an image of balloons that I will frame in the same Ribba frame from Ikea (just not keen to tackle an Ikea trip at 40 weeks pregnant!).


So there you have some DIY affordable art to brighten up a nursery (or any room). I am hoping to add a huge zebra painting above the cot at some stage. Just gotta sweeten up a certain artist ;) Wish me luck. 

Saturday, April 20, 2013

A rug to warm the baby's room


I love the internet but sometimes it opens up ideas and possibilities that are hard to attain. Similarly, I love this country but sometimes it is so hard to find products here that we see so frequently on the web. Rugs are one such item. Australia is only just catching onto the bright, modern rug trend, with chevron, moroccan tile/trellis and other geometric patterns. For the baby's room, I almost felt like the only option was a black and white rug in a stripe or chevron, but I kept delaying buying one because I worried the room would be too grown up with the newly dark floorboards and charcoal paint strip. As much as I want a room that fits our home's style for all of us to enjoy, I also want it to be a fun room that will stimulate a child's imagination. I'm so glad I held out.


About three weeks ago, at almost 38 weeks pregnant, a darling friend text me about some fantastic rugs that had just come up on the members-only online shopping site, Temple and Webster.  I was logged in and admiring them on my phone within moments. Suddenly waiting in the hospital for an appointment became exciting! Within half an hour, I'd text the colour and pattern options to the Mister, made a decision and ordered the rug pictured above and below.


It's called a Hiranmayi Indian Dhurrie Rug from The Weaves Collection and is hand woven in pure wool. At 280 x 190cm, it also covers a lot of floor space and makes the room feel so much cosier. I'm in love with it! Especially the pattern. So glad I didn't have to settle. 


The colour is described as 'Gold'. Four weeks ago I ordered a wingback armchair and a footstool in a Warwick fabric called Mystere Honey. It's also a dull yellow so I am crossing my fingers that they work well together. The empty corner in the left of the room is where I plan to place the armchair. I'll post more about that soon.

As Temple and Webster is a sale site, this rug is no longer available there and I can't find it anywhere else online. However, I did spend a lot of time seeking out rugs so I'm going to pass on details of others available in Australia that I considered.

I was excited by the chevron rugs at Jolie Interiors  but the 12 week lead time and the limited colour choice of pink, grey or navy held me back.


Gilles and Franck had something similar with more colour options but they appear to just be starting in the business and operate through Facebook. Without a fully functioning online store, it seemed too hard and uncertain for me.


I'm really impressed with a new range of rugs from Freedom and checked them out several times in store (always so nice to be able to view before purchase). At $249 they are also very affordable. Unfortunately, they are quite gender specific (and we don't know what we are having) or black and white.


My back up plan was the trusty Ikea Stockholm rug. Certainly not a unique choice but very versatile and affordable. It comes in two sizes but neither seemed right for our room - one being too small, the other perhaps too big! And of course, it is black and white - a colour combo I love but would prefer in, say, our dining room. 


So, slowly we are getting a few more design choices closer to home. My choice of rug arrived in just over a week and has made my heart sing ever since. I can't wait to add a floor cushion or two and spend some quality time on it with our little friend. Just gotta entice him or her to come out into the big, wide world!

Wednesday, April 17, 2013

Quilts for the cradle, cot or even the car


So what does one do on maternity leave pre-baby? Well each to their own, but between scouting out the last of the necessary newborn essentials, watching downloaded TV shows and trying to rest, I've gotten a little crafty. I recovered the shelves of a Jenny Lind change table with fabric (see here) and I finished making over a lamp (see here). I've yet to post about my DIY artworks but I'll get to that another day. Let me share with you a quilt I made with the mustard yellow fabric leftover from covering the change table. 


I love this fabric's geometric pattern so I wanted to make use of it. I also had a piece of nice cotton batting leftover from a very special project earlier in my pregnancy (more on that below). It wasn't big enough for a cot quilt but plenty for a bassinet or cradle quilt or even a rug to play on. For the other side of the quilt I thought it would be fun to use another colour and remembered that Spotlight had this fabric in duck egg blue. We might use this quilt on the cradle in our bedroom which has quite a bit of this colour in the bedding and artwork so it was a no-brainer to buy a small piece of the blue fabric. Not that our room is very put together. Apart from the bathroom and toilet, it's the only room we haven't painted. When we moved in it was the nicest room in the house with decorative cornices and curtains that matched the wall colour, so we've left it. One day I'd like to paint it, replace the window coverings and recover the bed head but that may be some time off now with a baby due any moment. Anyway, I digress...


So, I made a little quilt and took a pretty freestyle approach, letting the size of the batting determine the quilt size (about 92 x 66cm from memory). I just cut the yellow and blue fabrics a few millimetres wider than the batting and pinned them right sides together with the batting on top then sewed around the four sides about 10mm from the edge, leaving a 20cm section unstitched in the centre of one side. I made sure to trim off the corners at the diagonal close to the seam to remove the bulk of the batting in the corners.  After turning the quilt out through the 20cm gap, I pushed out the corners and seams then gave the whole thing a good iron, paying attention to the edges and ironing in the material along the gap.  Being an amateur seamstress, I don't know how to do a blind stitch properly but I did my best to hand stitch the inside of the fold along the gap to make an invisible seam. To hold the batting in place and make it more quilt-like, I decided to sew diagonal lines from one side of the quilt to the other. I followed the lines on the fabric's pattern to keep me on course. I really love the diamond pattern this has created.  

The finished product seems to fit nicely in the cradle. Speaking of which, on my long search for a Jenny Lind cot, my mum found this cradle for us. In fact, she found it within five days of me texting her a photo of the first Jenny Lind change table I picked up! She's quite the bower bird my mother! With a few new screws and coats of Rustoleum satin white spray paint (which my mum highly recommends), it came up nicely.


Hopefully it will come in handy as we also had to add a mattress and a couple of waterproof mattress protectors and sheet sets. Babies come with so much paraphernalia, I tell you. Even when you try to keep it simple, it's out of control. However, I have been told that a cradle comes in handy to get the baby used to sleeping in different environments around the house where there is light and noise, especially if you are busy in a room away from the nursery and want the baby close by. Also good if you want the baby in your bedroom at night. We are yet to see what will work for us but at least we have some options. 


Now you may be wondering how I had the confidence to whip up this little quilt. Turns out I had some expert instruction from the Mister's aunty at the end of last year. We spent a fun evening at the dining table make a quillow - a cross between a quilt and a pillow. It was the first thing I made for the baby and it encouraged me to keep creating. As I'm not the girl to be giving out sewing instructions, I'll just point you to these instructions that Aunty Cele referred me to for a method of making a basic quillow (with a warning to disregard the panda fabric!).  

I used cotton drill fabrics for the quillow. A solid red for the back and a patterned red and white drill for the front. Choosing it was the hardest part of this project! The pattern includes rocket ships, stars, hearts and birds - that's about as gender neutral as I could find. 


There is a square pocket sewn in the centre of quilt at the base of the rear.


Once you fold the quilt, you tuck it into this pocket et voila! You have a little pillow. Or should I say quillow?! I can throw this is the car or the pram for times when we may need a little warmth on the run. At other times, now included, it can sit in the nursery as a pretty cushion. Love how we got the birds centred on the cushion front :)


I should probably sew some lines across the quilt to keep the batting in place. Another 'one of these days' jobs. I've already learnt that washing a sewing project can be fraught with danger and I now know to wash fabric prior to sewing. After months of admiring the quillow, I recently washed it in preparation for the baby's arrival. Even on a cold wash, the red backing fabric ran into the white and the front side now has a bit of a pink tinge. Might just have to have a girl! Otherwise, a little dude with the confidence to rock a little pink!

Tuesday, April 16, 2013

A lamp makeover to light up the nursery


Yesterday, I posted about the first step in putting together a room for our baby - finding a cot in a traditional Jenny Lind style. Today I want to share with you a lamp makeover I did soon after. At the time, we'd started painting the room too but I was excited to move ahead with some fun decorative elements. After all, we had spent many hours cleaning out the room and the huge built in cupboards that take up an entire wall. The prep work is never fun! It meant many trips to the op shop to donate unwanted clothes, linen and other odds and ends we had crammed in there. The upshot of this is that one day I decided to wander around the op shop and stumbled across a lamp base that I thought had great potential. I'd just read Good Bones, Great Pieces (a book I'd recommend by Suzanne and Lauren McGrath) which perhaps inspired me to see beyond its current state. At $5.99 for a tagged and tested lamp, I could hardly go wrong. 

After wiping it over, masking the cords and the bit where the bulb sits, I set up my painting station in our front yard and gave it a coat of primer, followed by two coats of white. As I was doing this after work, I waited a day between each coat. You could do another coat 1-2 hours later but it got too dark for me to do that.


To do the red coats, I needed to spray without any breeze so I relocated to my brother's shed and enlisted his help as I didn't want to inhale too many fumes with a baby on board. You may now be wondering why I did coats of white when I wanted a red lamp. I did this simply because I wanted a bright red which I thought would be easier to achieve with a white base. In the past, I've found that the red appears dull when painted straight over the grey primer. In the end, we did so many coats of red that it may not have made a difference. I think we ended up with 3-4 light coats of red before we were happy with the colour and the coverage. So many coats is probably not something the experts would recommend but I figure you gotta do what you need to sometimes. 

Next step was a lampshade. As it didn't come with a shade, I used several shapes of shades I have at home to get an idea of what would look best. A barrel shade looked better than a drum shade so I picked up this one at Freedom. 


I tried it on in the shed before the final coats were finished on the base and my little brother instantly said it was too big and looked all wrong. I didn't want to believe him. After all, what does a 23 year old shed-loving male know about lamps? Turns out, quite a lot because it looked so much better with a smaller Ikea JARA shade ($29.99), with less variance in the diametre of the top and bottom on the shade. 


The final touch was a piece of yellow bias binding around the base of the shade, although I'm yet to decide if this is permanent. It is secured with one small piece of double-sided fabric tape at the rear of the shade so could be very easily removed. I'm yet to decide if it's too bright a shade for the rug and armchair we'll be bringing into the room. More on those fun elements later. 


Monday, April 15, 2013

Looking for Jenny Lind (the cot not the person)


Big news, dear reader. Tomorrow I'm due to give birth! My first baby is on the way and I can't wait. I meant to write months ago with the news but the time has just flown, and of course I've been busy finishing work and getting the baby's room ready amongst everything else. So here I am with lots of nursery posts in mind.

Let me start at the beginning though when I was on the hunt for a cot. It seemed like the starting point for a nursery to me, and the one that caught my eye was a older style "crib" with turned spindle rails. Soon enough, I found that this was called a Jenny Lind cot. It came up time and time again in my Pinterest boards for nurseries (here and here). 


 Via here 

This example of a Jenny Lind crib in yellow sends my heart into a flutter. So too does the aqua and the hints of watermelon red in the room. I knew I wanted me some of these colours. 


Via here

The Jenny Lind works in serene palettes too...


Via here

...or palettes that boldly incorporate black in a space often reserved for pastels.


Via here

I took inspiration from the hint of dark sophistication in these rooms as well as their graphical rugs. 

Via here

Aqua kept popping up, as did stripes and chevron (or zig zags). I kept noting the comfy feeding chairs in the rooms and my eyes were always drawn to hints of zebra, whether in rugs or wall hangings, like the beauty below.


Via here

So Jenny Lind it was, but how to get one? The internet opens up so many possibilities to us but in reality these things are not always available to us, especially here is Australia. I searched every Australian baby store site (or what seemed like it) and obsessively searched eBay. I even wrote to a fellow Aussie blogger who'd written about hers and tossed up using a third party shipping company as she did to send one over from the US where they are seemingly everywhere, but I felt uneasy about it. One day, I thought I hit the jackpot when one came up on eBay in Sydney but the seller refused to ship. After some wild ideas of how I could get it, I had to let it go and told myself it would need a lot of work and paint to get it into shape anyway (it looked like it could have been 20 years old). Finally, finally, I searched Gumtree and found something. The side rails are straight rails rather than the turned spindle rails but the end rails and everything else are just the same as other Jenny Lind replicas. Better still, it was already white, only a few years old, had only been used for a grandchild and came with a matching change table. Now, funnily enough, in all my searching I had already picked up a Jenny Lind change table but it was older and needed painting. So I was happy to pass that onto a friend and keep the set that didn't need much work. The shelves of the change table had been covered in bright pink wrapping paper crammed with teddy bears and other cutsie things that were not to my liking. After prising this off, I recovered the change table with a fabric from Spotlight. The cot just needed an inner spring mattress to replace the foam one it came with. Here's a sneak peak of how they are looking now. 


As you can see, the side rails are straight but the ends have the cute spindles. 


And here's the change table with the new fabric covering the shelves and a new change matt. 


I also added in some baskets to store nappies, wipes and all that jazz. I had hoped to find white but I got to a point where I had to buy something in fear of the baby arriving before the baskets! Not sure whether to get more for the bottom shelves or keep that few to stow the nappy bag. 


There's been lots else done to this room, from painting every surface and staining the floors dark to switching out the curtains for roman blinds, adding a rug and making art for the walls. I hope to be back to share these projects with you very soon. 

Share

LinkWithin

Related Posts Plugin for WordPress, Blogger...