Showing posts with label yellow. Show all posts

Thursday, July 18, 2013

A chair to finish the nursery


The wing chair for Leo's nursery required a month to be made, so I was almost happy when he didn't arrive on the due date because I'd only ordered it three and a half weeks beforehand. I couldn't hold him in forever though, even for a chair! He was eight days late but the chair was even later, eventually arriving two weeks late.


I'd been nervous about having a chair made in my choice of fabric and having to commit to it before seeing it finished. I sweated over the fabric choice. There were hundreds of options and I can be a procrastinator when deciding on big items like this. A neutral fabric would have been an easier choice but I really wanted something a bit more fun and distinct.

Eventually I settled on a Warwick fabric called Mystere Honey.


I found the manufacturer on eBay (seller rosemedley). They are a small, Melbourne company and hadn't made a wing chair in this colour before, so I had to visualise the fabric on this chair. 


Not long after ordering the rug, I stopped in my tracks while reading Domayne's Winter Launch 2013 catalogue because there were a few items covered in the Warwick Mystere fabric. I loved how the colour appeared in the catalogue, making me feel less nervous about my choice. Though being a velvet, I knew it would look different depending on the lighting in the room. Here's a shot of an armchair from the catalogue. My chair only looks this colour when it's really bright which isn't often given it's the middle of winter in Melbourne. 


Last time I shared a picture of the room, the wool dhurrie rug from Temple & Webster had arrived but there was a sad space in the corner.


The room feels a lot more complete with the chair, even though there are a few other things I'd like to do in here, namely another artwork for over the cot (haven't decided if I will create something myself as I did with the others here). For now, I love putting my feet up and watching the world go by while feeding in this sunny corner.


Best of all, Leo seems to enjoy cuddling up on the chair. Well, I don't really know that for sure. He definitely enjoys the milk I feed him while we're on the chair, so that's a start. I think his favourite spot in the room is the change table! Perhaps it's the undivided attention he gets on there, or maybe the nice feeling of having a dirty nappy removed? Whatever it is, I just enjoy the smiles and cute noises he makes on there. Can you see him in the picture below, holding his stuffed puppy and waiting patiently for his mummy to take photos?! What a little beauty he is.


Speaking of the change table, I've added more baskets since the baby arrived. I particularly wanted somewhere handy for the dirty laundry, so one basket at the bottom is devoted to that, but there's now lots of storage generally which is always a good thing. I'm not a big fan of stuff not having proper "homes"!


I'm currently working on a nifty little home for picture books so stay tuned for that. 


Wednesday, April 17, 2013

Quilts for the cradle, cot or even the car


So what does one do on maternity leave pre-baby? Well each to their own, but between scouting out the last of the necessary newborn essentials, watching downloaded TV shows and trying to rest, I've gotten a little crafty. I recovered the shelves of a Jenny Lind change table with fabric (see here) and I finished making over a lamp (see here). I've yet to post about my DIY artworks but I'll get to that another day. Let me share with you a quilt I made with the mustard yellow fabric leftover from covering the change table. 


I love this fabric's geometric pattern so I wanted to make use of it. I also had a piece of nice cotton batting leftover from a very special project earlier in my pregnancy (more on that below). It wasn't big enough for a cot quilt but plenty for a bassinet or cradle quilt or even a rug to play on. For the other side of the quilt I thought it would be fun to use another colour and remembered that Spotlight had this fabric in duck egg blue. We might use this quilt on the cradle in our bedroom which has quite a bit of this colour in the bedding and artwork so it was a no-brainer to buy a small piece of the blue fabric. Not that our room is very put together. Apart from the bathroom and toilet, it's the only room we haven't painted. When we moved in it was the nicest room in the house with decorative cornices and curtains that matched the wall colour, so we've left it. One day I'd like to paint it, replace the window coverings and recover the bed head but that may be some time off now with a baby due any moment. Anyway, I digress...


So, I made a little quilt and took a pretty freestyle approach, letting the size of the batting determine the quilt size (about 92 x 66cm from memory). I just cut the yellow and blue fabrics a few millimetres wider than the batting and pinned them right sides together with the batting on top then sewed around the four sides about 10mm from the edge, leaving a 20cm section unstitched in the centre of one side. I made sure to trim off the corners at the diagonal close to the seam to remove the bulk of the batting in the corners.  After turning the quilt out through the 20cm gap, I pushed out the corners and seams then gave the whole thing a good iron, paying attention to the edges and ironing in the material along the gap.  Being an amateur seamstress, I don't know how to do a blind stitch properly but I did my best to hand stitch the inside of the fold along the gap to make an invisible seam. To hold the batting in place and make it more quilt-like, I decided to sew diagonal lines from one side of the quilt to the other. I followed the lines on the fabric's pattern to keep me on course. I really love the diamond pattern this has created.  

The finished product seems to fit nicely in the cradle. Speaking of which, on my long search for a Jenny Lind cot, my mum found this cradle for us. In fact, she found it within five days of me texting her a photo of the first Jenny Lind change table I picked up! She's quite the bower bird my mother! With a few new screws and coats of Rustoleum satin white spray paint (which my mum highly recommends), it came up nicely.


Hopefully it will come in handy as we also had to add a mattress and a couple of waterproof mattress protectors and sheet sets. Babies come with so much paraphernalia, I tell you. Even when you try to keep it simple, it's out of control. However, I have been told that a cradle comes in handy to get the baby used to sleeping in different environments around the house where there is light and noise, especially if you are busy in a room away from the nursery and want the baby close by. Also good if you want the baby in your bedroom at night. We are yet to see what will work for us but at least we have some options. 


Now you may be wondering how I had the confidence to whip up this little quilt. Turns out I had some expert instruction from the Mister's aunty at the end of last year. We spent a fun evening at the dining table make a quillow - a cross between a quilt and a pillow. It was the first thing I made for the baby and it encouraged me to keep creating. As I'm not the girl to be giving out sewing instructions, I'll just point you to these instructions that Aunty Cele referred me to for a method of making a basic quillow (with a warning to disregard the panda fabric!).  

I used cotton drill fabrics for the quillow. A solid red for the back and a patterned red and white drill for the front. Choosing it was the hardest part of this project! The pattern includes rocket ships, stars, hearts and birds - that's about as gender neutral as I could find. 


There is a square pocket sewn in the centre of quilt at the base of the rear.


Once you fold the quilt, you tuck it into this pocket et voila! You have a little pillow. Or should I say quillow?! I can throw this is the car or the pram for times when we may need a little warmth on the run. At other times, now included, it can sit in the nursery as a pretty cushion. Love how we got the birds centred on the cushion front :)


I should probably sew some lines across the quilt to keep the batting in place. Another 'one of these days' jobs. I've already learnt that washing a sewing project can be fraught with danger and I now know to wash fabric prior to sewing. After months of admiring the quillow, I recently washed it in preparation for the baby's arrival. Even on a cold wash, the red backing fabric ran into the white and the front side now has a bit of a pink tinge. Might just have to have a girl! Otherwise, a little dude with the confidence to rock a little pink!

Monday, September 5, 2011

Sunny cushions to break up the monotone

The great thing about a black and white or neutral base for a room is that it's easy to change the look by adding your current colour/s of choice. It's no secret that yellow is the hue of the moment for me so its no surprise that I've added some cushions with yellow tones to our living room. 


Renowned interior designer, Patricia Gray wrote on her blog that "yellow wakes up a room like the rising sun, it is cheerful and uplifting" and I follow her sentiment. For a little uplifting sunshine in our own living room, I started by adding some yellow wooden beads from Bali (see more here).


I'm now working on some abstract artwork in pink and yellow (see more here). 


Textiles were just the obvious thing to add next. After plenty of practise with other cushions (here and here), I sewed four 30 x 50cm lumbar cushions in a yellow and white striped fabric and a floral fabric with yellow, pink, white and a touch of purple.


Both fabrics were found at a nearby Spotlight and were around $10 and $12 per metre.


I am partial to a fresh flower and yellow orchids are a real fave at the moment, for their longevity and their vibrant colour. 


Once the artwork is complete, that should be enough yellow. I don't want to go overboard, just a few pops of colour to bring some life to an otherwise monotone space.

Thursday, July 28, 2011

Hall stand: before and after


Here's a closer look at the hall stand makeover as promised in yesterday's post on the painting of our entry hall. Yes, it's Dulux Domino again! I have not tired of this colour. It can look black, charcoal and navy depending on the light and I'm happy with all shades.  I also like it against the new Taubmans Mink Scorpio walls.


After sanding, applying 3 coats of paint and spraying with a lacquer, I replaced the knob on the little drawer with a black and white striped one from Provincial Living, just as I had used on the lamp table in the living room. These pieces can both been seen from the entry so it ties the spaces together nicely.

The hall table is another eBay bargain that I picked up for about $40 when we moved in last year. It needed to be narrow to fit the small space, and while the rounded corners are a little daggy in a country furniture kinda way, they are ever so helpful in avoiding bruises from sharp edges when stumbling to the toilet in the middle of the night! You have to consider these things! The mirror is great for checking that you are properly clothed as you dash out the door and the little drawer is handy for keys and little odds and end that otherwise get strewn near the front door. This leaves the surface clear for little cheerful displays to greet us and our guests as we enter. Here I've used a yellow orchid from The Flower Shed in the shade that makes my heart sing the most - yellow!


Linking to:
Thrifty Decor Chick
A Beach Cottage


Sunday, July 24, 2011

Sartorial Sunday: J'adore Cadel

Sartorial Sunday: J'adore Cadel

Sartorial Sunday: J'adore Cadel by Ellise Whyte 

To celebrate the final day of the Tour de France and Cadel Evans' brilliant win, I'm using the yellow of his winning jersey as fashion inspiration. I've loved the scenery in the TV coverage, the comforting sounds of the commentators, the Taste Le Tour segments by Gabriel Gate and of course, the talent and determination of Cadel as he finally clinched the Tour. Can't wait to hear Advance Australia Fair on the Champs Elysee!

Wednesday, June 22, 2011

Cafe Love: Three Bags Full


There are few perks for a small-time blogger, it is mostly a self-gratifying pastime with a frequent feeling that no-one is really reading, bar those kind souls who may be bound by friendship (or blood!). One lovely perk that does come to mind is the recommendations I'm given for cafes and shops I might like to eat at or visit. A highlight is Three Bags Full in Abottsford - a cafe suggested to me for the light fittings and the excellent coffee.


The lights did appeal, especially the quirky cups and saucers dangling over the bar. Of course I loved the industrial light over the til and the bare bulbs over the tables by the front windows. Nothing new there, I've professed my love in that department many times. The pleasant surprises really delighted too, like the touches of yellow in both the pepper grinders and the road signs repurposed as stools.


Located in a converted warehouse, Three Bags Full is a natural at industrial chic style and sits close to the border of grunge. With so many quirky touches, high marks must be given for decor, even if personal taste dictates a larger dose of feminine comforts before a space can be declared 100 per cent swoonworthy. Take this menu below, for example. It is cool, yes, and it does have touches of my beloved yellow but it looks dirty and I'm not so keen on dirty. Pretty, white paper may be boring but it does help in reading a menu easily.


Speaking of the menu, Three Bags Full offers some exciting choices that make selection very tough.


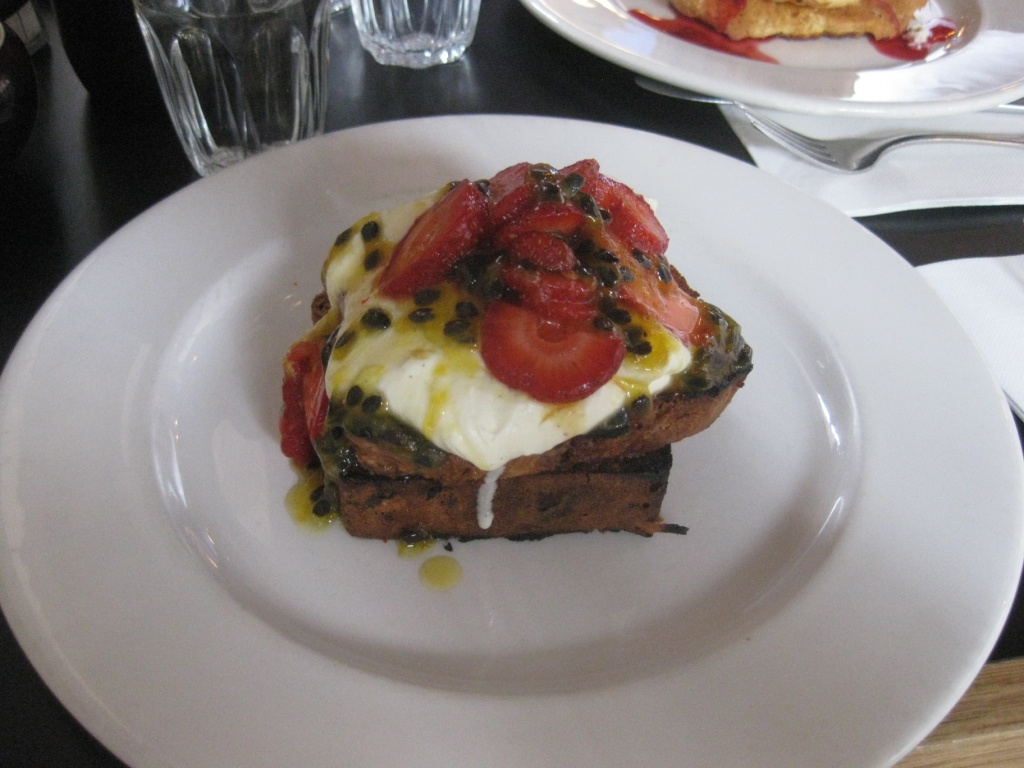
Eventually I chose this toasted house made fig and raspberry bread with vanilla bean mascarpone, fresh strawberries and passionfruit ($14.50).

House made anything gets me excited and this dense fruity bread did not disappoint. The mascarpone was fresh and heavenly, if a little too indulgent. Not that this thought crossed my mind until every morsel was consumed and I was beginning to think I shouldn't have ate every last scrap. How could I not eat it though?!


The ricotta hot cakes with poached fruit and orange infused ricotta ($14.50) caused me to develop a heavy dose of food envy. Oh my. Good by all reports.


The last dish to grace our table was a special and my memory of the details are sketchy. They are fritters with asparagus and poached egg, although I'm not sure if they were cauliflower or corn or both! I do remember that the sauce was mild and could have done with extra zing.

For good reason, throngs of Melburnians descend upon Three Bags Full on weekends. There are lots of seats (although you may still have a short wait), the food is delish and the decor provides some interesting delights.

A return visit would be welcomed, a sure sign of my approval (as described here). I love it when others know what I love!

Three Bags Full on Urbanspoon

Tuesday, June 7, 2011

Crazy for cushions


After sewing a pair of European cushions from Simplicity pattern 5600, the cushion bug had taken hold so I started making one of the other very simple patterns for a small square cushion. Using an ornage trellis fabric from Spotlight, I sewed a pair of cushions for my mum's outdoor area.


 Envelope closure on orange trellis cushions

Now I'm feeling confident on the basic cushion, I've adapted the pattern to fit a 30 x 50cm lumbar cushion. Using a Greek key pattern in an off white and rust colour, these three cushions are now on armchairs at my mum's place.
Greek key fabric from Spotlight


It was a process of experimentation and improving my own pattern so the envelope closure is on a different spot on each of the three cushions. By the final cushion, I put the opening three-quarters of the way along (as per photo below), making it easier to insert a long skinny cushion into the cover.

Envelope closure on Greek key lumbar cushions
Now that I've worked out the dimensions that work best, I've cut my own pattern from brown craft paper. When I get the urge to whip up a cushion, this makes it so much quicker as all the deliberating over measurements has been done.


I've now started making cushions for my own place, the first being this yellow one above. Creating something in the space of a weekday evening is so satisfying. Now I must get back to learning to insert a zip.

Sunday, May 29, 2011

Sewing sunshine


Sewing may be one of those hobbies that takes hold with force for an intense few months and is then abondoned abruptly. Or so I start thinking when the Mister tells me that setting up a permanent sewing table is akin to buying a treadmill! No matter, I am enjoying this new love and I am managing just fine with my temporary workstations on the desk or dining table, and Aunty Cele's sewing machine is an agreeable and dependable dame.

After completing a beginner's sewing course recently, I was ready to buy a pattern and attempt it solo. The European cushions in these photos are the fruits of my labour. If you catch me skipping past our guest bedroom, it's because I've just set my eyes on these babies and I'm feeling all proud and disbelieving. I somehow managed to make sense of the confusing, jargon-laden instructions of the Simplicity pattern (5600) and sew these big, happy blobs. 


In the absense of a bedhead, they add a little more impact to the bed. See here for the room earlier this year. The beautiful yellow orchids are from my lovely local florist, The Flower Shed. They were moved from the living room for this photo. Normally, I keep fake hydrangeas here. Faux flowers, quelle horreur!


The cushions have envelope openings which is just as well because I'm still learning to insert zips in my new sewing class.


And here are the orchids in their real spot, looking so cheery with my Bali treasures on the table I painted. 


Can you tell I believe in looking for the sunshine in otherwise grey days? It's been a cold end to autumn, but I'm enjoying the bursts of falling yellow leaves in the streets and I love bringing other sunny hues inside to brighten our home. Hope your day is sunny and your heart warm :)

I'm linking to http://www.abeachcottage.com/

Friday, January 7, 2011

Pearls of wisdom: Do what you love and do it often


I love this design created by the insanely talented Joy Kelley from Howjoyful. She has so generously provided her design in several colours as a free printable download. Check it out here. 

Share

LinkWithin

Related Posts Plugin for WordPress, Blogger...