Tuesday, May 3, 2016

Farewell Footscray and our home sweet home

A note from me: Here's a post I wrote a year ago and never posted. As much as I have truly adored writing this blog, I feel it may have run its natural course. Reading over this post, it seems to finish things off with "after" photos of our place before we moved last June. These days, you can find me on Instagram @charleswhyte. As always, I'm hunting for the things that make our hearts sing and most days, I find a few gems. My little cuties brighten the greyest of days! I hope our paths cross again soon. 

Over five years ago, one of my early blog posts was titled "Au revoir Moonee Ponds, Hello Footscray". Now, with mixed feelings, we are saying goodbye to our sweet home in Footscray and moving on to something bigger in the nearby suburb of Yarraville.


Another of my very early blog posts, titled "A place to call my own" shared a photo of our place way back then. In that post I said something about imagining the house when we'd poured our souls and a coat of paint over it. I'm now confident we've done both so perhaps it really is the right time to bid farewell. 

We've come a long way, baby! Parts of our journey in transforming this house into our home have been documented here so it seems only right to share the end of the road too. Throughout this post are the photos taken by our real estate agent, Jas Stephens. Most rooms have been shown here before, but these shots with their panned out, wide angles give you a slightly different view and show you some of the general improvements that I never shared. The external painting, new front garden and dark floor stain are the obvious examples. 


A few notes on colours and suppliers...
Paint: Exterior walls are painted Haymes Silverado, windows are Dulux Vivid White, gutters, verandah posts and door are Ironstone (Colorbond), roof is Sonora Sea (also a Colorbond colour). 
Deck: jarrah tongue and groove boards for a period look. Made by my very clever Mister and our carpenter friend, Yan. 
Chairs: salvaged from my Grandad's shed and painted by moi 
Path: bluestone pavers quarried locally in Victoria
Turf: King's Pride buffalo laid by aforementioned clever guy
Lacework: "Chantilly" powder coated aluminium by Chatterton's 


Come inside...


This is a view of the front hall inside the front door, looking into the living room and our bedroom. An old post on making an entrance shows some before shots of this space. Our bedroom hasn't featured a lot on the blog, perhaps because it started as the nicest room when we bought and we never painted it! We did swap the mauve damask curtains and lace for something simpler, replaced the dated light fitting, stained the floors and installed a split system.

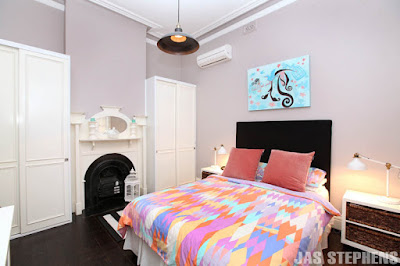

Leo's nursery has popped up a few times, most recently here. It's one of my favourite rooms and gets the best afternoon light. I'm so excited that it will soon appear in Little One magazine! It was our guest room BB (Before Baby). Do you remember this?


The living room is looking much better here than when it was covered in red brick dust. I don't miss that. Old posts here  and here. And really old ones hereherehere.


For most of our time here, we've used the third bedroom as a study (see this old post on how we transformed this space with paint and this post for how it looked afterwards). When Leo arrived, we put a sofa bed in here for guests and installed the robes on either side (they were an awesome find on a 'buy, swap, sell' site on Facebook!). To sell, we put a proper spare bed in here rather than a sofa bed. On the day these photos were taken, I stapled fabric from Spotlight on a canvas to create some "art" for above the bed.


In the bathroom, we replaced tabs, doorknobs, the mirror and shower curtain (see details here) to make the space our own without major work.


I would have loved to replace the kitchen floor tiles and cabinets but just replacing the mixer tap (is it a faucet?!) and the door handles made a big difference to my enjoyment of the space.


I never blogged about it but one of my favourite changes in the kitchen was removing the timber venetian blinds and replacing with a white roller blind hidden behind a pelmet I had made (covered in black and white fabric from Ikea). We also painted over the tile strip in Dulux Domino and painted the walls on this side in Dulux Whisper White.

We also went Domino crazy over the other side of this room in the dining area. The dark colour makes a gorgeous, intimate space for a dinner party. As you can see, I never got around to sanding the inside of the French door in order to paint it (so much to do, so little time!).


The first bit of work on this space is documented here. Of course, we did the floor boards after this time (LOVE black Japan floors!). You also get a glimpse in this post on the kitchen dresser.

Here's our tiny back yard and one of our biggest reasons for moving. The little man needs some grass! Good news is that our new abode has that in abundance.


I do love these hedges though. 


So there you have it, a glimpse into our little home, sweet, home. It has blessed us with five good years and I will miss it dearly. Six weeks after settlement, our second bundle of joy is due! So times are a'changin' and new pastures are calling. Our new place is in dire need of some love which means starting over. This time we will have the space to create a forever home if it feels right.

So where are we going?!

Initially we had hoped to find a new place closer to home in West Footscray, but it wasn't to be. I feel a sense of trepidation moving suburbs. Rather silly since Yarraville is about 3 kilometres away and a lovely place to live, by all accounts! I love my home though, and I love the little WeFo community. In the days following the auction of our new place, my mind filled with the things I'd miss. The funniest things, like not being so close to Sims, our local independent supermarket, where we bump into Rodney. He's lived in the same house on Barkly Street all his life and is spending his later years strolling between Sims and the cafes and shops of West Footscray. Sometimes he calls Leo "Leon" but so what?! Back in December we bumped into him at the local medical clinic when Leo hurt his leg and only recently has Rodney stopped asking how it's going. Bless him. I'm also coming to terms with being further from Leo's child care centre (until we get into the one in Yarraville which could be a year or two) and not being able to walk 100 metres to my hairdresser! Of course, there are going to be so many wonderful new things to discover in our new 'hood but I have to have my little grieving period.

P.S I know I have committed the immortal blogging sin of going AWOL for far, far too long. I do apologise. I have thought of you, dear bloggy and dear reader, so much in this time but just never managed to put finger to keyboard. Shocking and ridiculous I know. I'm working on making time for things I love but it ain't easy, as I'm sure you all know. Motherhood is a consuming beast, as is life itself! If you're not careful, it sucks you in and suddenly another year has flashed by. I want to promise that I will stop picking up the endless trail of toys and fussing over the next meal in order to write another post pronto... but I'd hate to break a promise! Until next time, take care and just do things that make your little heart sing :)

Monday, February 24, 2014

Gifts for a newborn: DIY felt finger puppets and theatre


When friends had a beautiful baby boy last month, I knew I wanted to get crafty and give them some handmade gifts. It just made sense since they are great supporters of this blog and my DIY projects, plus Mrs Tee (now Mummy Tee!) is known to make amazing advent calendars each Christmas for her little family members.

After seeing the felt characters that Jenny made for her daughter on Little Green Notebook, and reading how she treasured the things her own mum made for her growing up, I was inspired to make felt finger puppets.

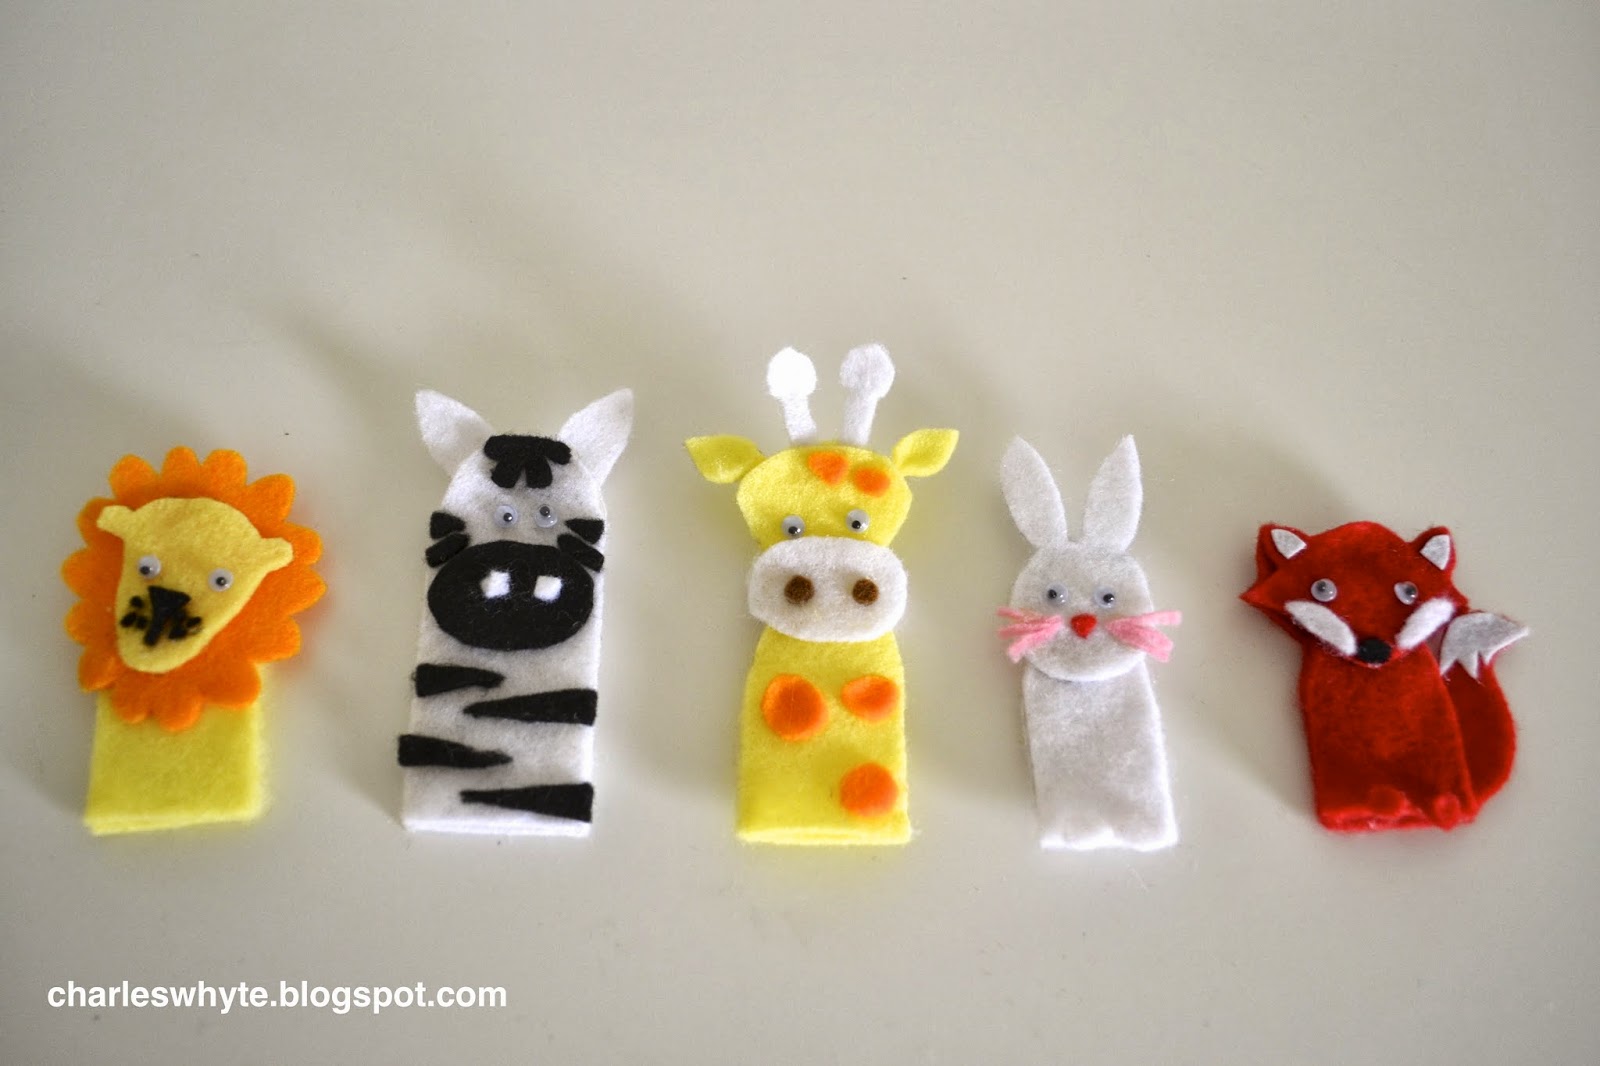
For the puppets themselves, I found heaps of inspiration by doing a Google image search and just picked animals and designs I liked. See my Pinterest board for more ideas and to see where I borrowed my designs from. I ended up with a lion, zebra, giraffe, rabbit and fox.


The fox was inspired by this chevron onsie in Big W. I'm not big on heaps of emblems, patterns and words splashed all over baby clothes but I think this one is adorable. Bargain prices at Big W too. If you are prepared to wade past the not-so-adorable clothes and squint creatively, you can find some good stuff at the cheap department or chain stores.


Baby Tee will be well out of this body suit by the time he can play with the finger puppet but I enjoyed making it all coordinate :)


 To make the puppets, you will need felt pieces in various colours, sharp scissors and glue. I also used little stick-on eyes but you don't need these if you'd prefer to cut eyes from the felt.


 I found all the supplies at Spotlight but most craft stores would have these items. I chose to use a hot glue gun because I had one already. Fabric glue would also work.

After lots of cutting and glueing while baby Leo was napping or playing, I ended up with five finger puppets I loved. Somehow, they seemed a little lost without a theatre so I transformed a box from one of Leo's toys into a little home for them. The hot glue gun worked wonders in adhering the striped fabric onto the box as curtains for the theatre. For the red cardboard though, a combination of craft glue and double-sided tape was more than enough.


The back and sides of the theatre are covered in brown kraft paper and jazzed up with stars cut from yellow card and stickers from Kikki K.


The box originally had a red lid so it was perfect for creating an entrance to the backstage area.


So there you have it, a little theatre and five furry friends for Baby Tee. Hopefully it holds up long enough for him to direct a few puppet shows in years to come. I had such fun making it.


To round out his gift, I picked up a few other pieces at Big W that we've found really handy with Leo.  Firstly a three pack of these white body suits or onesies. My nanna got Leo a set in size 000 and we had them on him for so many months under clothes in place of a singlet or with a pair of leggings (like the navy and grey pair below which were about $5). They just seemed to stretch with him. I promise we weren't squishing the life out of him when I say he was still wearing them even when his other clothes were 00 and even 0! I've noticed Big W doesn't always have stock of all the sizes in white so I may not be the only person to think they are good value (about $9 for a 3 pack).

In the suit pictured, I sewed on a little pocket just for fun.


The last item, in the far right of the photo below, is a new style Bonds Wondersuit. The fabulous thing about these is the two-way zipper which is exactly what you need when changing nappies overnight. Who really wants to do up all those buttons or snap fasteners in the dead of night?! Or anytime really. A baby might as well take advantage of being able to wear a onesie day and night. After all, they grow up so quickly and will be wearing separate tops and bottoms for the majority of their lives. Baby Tee, kick back while you can. Wear onesies and play finger puppets! And have a lot of fun! xx


Wednesday, February 5, 2014

A new obsession: hobnail milk glass


Do you ever wonder how you become fixated on certain items? Or how you go from not knowing what something is one day to feeling like you must have it the next? I must have an obsessive streak in me because I know too well the feeling of lusting after things, especially interior-related items. Sometimes, it's all about the thrill of the chase and tracking down hard-to-find beauties. Since this blog is all about the hunt for things that make my heart sing, it's probably obvious that I enjoy a good hunt, even if I'm not always collecting a booty. Must be the thrill of the chase. Truth be told, I'd love to be bringing all the treasure home, but neither my bank nor home can stretch that far.

Image via Haus of Mason

So, what's my latest obsession you ask? One look at the title of this post gives it away - hobnail milk glass. Do you know it? Milk glass is pretty much as it sounds - glass coloured the shade of a creamy white milk, while hobnail refers to the textured pattern of the glass which mimics the look of a hobnail. A hobnail is a short nail with a thick head traditionally used on the soles of shoes or boots. 

Image via Haus of Mason

I'm not having much luck finding it on eBay here in Australia but it seems to be everywhere on Etsy and blogs in the US. There's an old manufacturer called Fenton that seems to have made the bulk of it and I'm hoping some of it will surface when I get around to fossicking in some op shops and vintage stores. You can see my Pinterest board on hobnail milk glass here. 

Image via Haus of Mason

As for how this new love grew, I can only think that a certain mug I fell for while on holiday over the Australia Day weekend is to blame (holiday deets below). It wasn't hobnail as such, and I've since found they are currently available new in stores (yay), so not at all vintage either. I guess it just ignited something in me, most likely a memory of beautiful milk glass collections on the blogosphere. 

Image via House

It's made by Alex Liddy and is available in House stores. They call it a "Textured Mug - Dots" and at only $7.99 a pop, I gotta get me some! Usually I stick to my Country Road Bistro mugs in various patterns and colours but I've noticed my mum steers away from them when she stays, instead preferring some smaller bone china mugs I have (but don't like). Hopefully she likes drinking from these as I want to say goodbye to those other ones. Hello imitation hobnail! While I hunt down the real deal, these are sure to make my heart skip a little faster. 

Note on the holiday long weekend: We spent a lovely long weekend at Martha Cove on the Mornington Peninsula in this holiday house. Clearly I was a fan of the crockery! The kitchen was very well-equipped and overall the furnishings were pretty tasteful. Plenty of room for three couples and little ones. I'd also highly recommend a visit to the Peninsula Hot Springs and a wander around Sorrento. Elephant is a must-visit homewares store there (oh my, LOVE that place. I stumbled on it a year ago and I was so happy to be nearby recently that I went twice in one day!). We also enjoyed visiting the Ashcombe Maze and the Red Hill Brewery. We had a Mornington Peninsula attraction pass which made things more affordable. There is so much to do in this part of Victoria and it's an easy drive from Melbourne for a day trip or weekend. 

Saturday, December 21, 2013

Christmas baking: almond bread


The lead up to Christmas can be such a wonderful time. I think I might even like it more than the day itself. Now I don't mean the shopping with the hoards or driving around on the chaotic streets. Hate all that. It's the Christmas decorating, baking and catch ups I love. When the tree is up and the stockings hung, the carols go on full blast and I mix bags and bags of flour and sugar with towers of butter! So far I've brewed up gingerbread, mini rocky roads, salted caramel fudge, cookies and cream fudge, date, raison and hazelnut liquor truffles and my old favourite, almond bread. My mum used to make this and I've been baking it for at least the last six years. I always make at least four loaves and give it away in clear cellophane bags tied with pretty ribbons (The wrapping is important! I also love wrapping presents nicely. What can be more exciting that opening a pretty package?). Almond bread is also great to serve to guests that pop in ** over the festive season. Great with a coffee or a bowl of cherries. 


Almond bread 

Ingredients

2 egg whites
½ cup caster sugar
½ teaspoon vanilla
2 egg yolks 
1 cup plain flour
120 grams unblanched almonds

Method

Beat egg whites until stiff but not dry.
Add caster sugar gradually while continuing to beat.
Fold in vanilla and lightly beaten egg yolks.
Sift flour and fold in with almonds.
Place in loaf tin that has been lined with baking paper.
Bake at 180C for about 40 minutes or until a skewer comes out clean.
When cool, wrap in a glad wrap and leave for 2 to 3 days.
Slice with a sharp knife as thinly as possible.
Place on a baking tray and dry in oven at about 120C until golden but not brown.
This should take an hour at most. Turn off oven and leave to cool.
Store in an airtight container. 


** A note on popping in. No one pops in when you want them too, do they? When the house is clean and something delicious has just come out of the oven, all your friends and family are no-where to be seen. The act of popping in seems to be dying off and I wonder if it's a generational thing. I admit that I like a bit of notice when having guests. I need time to pull off my ancient slippers with the paint splotches and wash all the baking dishes! But I have great childhood memories of family friends popping in when growing up, especially at this time of year. So, now that the cupboards are stocked with freshly baked goods, should I put the vibe out for a few pop ins?!?

Wednesday, October 16, 2013

Mini Oreo Cheesecakes


I'm always coming across recipes and thinking how perfect they would be for people in my life but then their birthday comes around and I struggle to remember which winning dish I was going to make for them. Well yesterday was one of my *little* brother's birthdays and I remembered the winning recipe. Oreo cheesecakes! My brother loves cheesecake, enjoys an Oreo or two and I love making clever little things that I haven't tried before. So it was a winner before it even began. 

Mini Oreo cheesecakes with the standard size ones behind

This recipe was simple and worked really well. The result was delicious (birthday boy's opinion not just my own!). I'm so glad it did as my brother has been extra important this year. After Leo was born in April, he popped in nearly every day to cuddle Leo and say hi. It was so good to have his company when I was getting used to being home with a baby. Not to mention how good it was to know that he was happy to hang out with Leo for a few minutes if there was something I needed to get done. That certainly deserves a special recipe in my book. 


Oreo Cheesecakes 

Source: 3 Square Chef. Originally from Martha Stewart Cupcakes.
Makes 15

21 Oreos, 15 left whole, and 6 coarsely chopped (or you can use a combination of mini Oreos and standard size ones like I did. I made 12 standard and about 20 mini)
450 grams cream cheese, room temperature
1/2 cup caster sugar
1/2 tsp vanilla bean paste (or vanilla essence)
2 large eggs, room temperature, lightly beaten
1/2 cup sour cream
Pinch of salt

Preheat oven to 135 celsius. Line standard muffin tins with paper liners. Use mini muffin tins if you are using the mini Oreos. Spray liners with non-stick spray. Place 1 whole cookie in the bottom of each lined cup.

With an electric mixer on medium high speed, beat cream cheese until smooth, scraping down sides of bowl as needed. Gradually add sugar, and beat until combined. Beat in vanilla. Drizzle in eggs, a bit at a time, beating to combine and scraping down the sides of the bowl as needed. Beat in sour cream and salt. Stir in chopped cookies by hand.

Divide batter evenly among cookie-lined cups, filling each almost to the top. Bake, rotating pan halfway through, until filling is set, about 22 minutes. The mini ones take less cooking, about 15 minutes. Transfer to wire racks to cool completely. Refrigerate at least 4 hours (or up to overnight). Remove from tins just before serving.


Note: the standard size cheesecakes look great turned onto a plate for serving. The mini size are tiny bite size cheesecakes and they don't look as neat when turned out of the paper liner. I recommend baking in thin white liners so you can see the Oreo through the bottom when served in the liner. Unfortunately, I only had mini brown liners at home and I couldn't see the Oreo imprint through it. 

* Disclaimer. My brother is 24, not that little really, but once a little brother, always a little brother. Right?!

Saturday, August 10, 2013

Tomato, butter bean and chorizo salad


When I made this tomato, butter bean and chorizo salad for a family lunch this week, I knew it was about time I shared it. Last December, our lovely neighbours made it as part of dinner and I immediately asked for the recipe. They went one step further and loaned me the recipe book it was taken from - The Edible Balcony by Indira Naidoo. So strong was my love for this salad that I brewed it up numerous times over the festive period. Since the ingredients aren't highly perishable, I found it a good salad to make while travelling around the countryside to family gatherings. In the morning, I'd cook up the chorizo, cut the onion and mix the dressing, then transport them in separate containers to avoid the dreaded salad sludge. Once at the destination, I simply had to chuck them all together with the tomatoes, tinned beans and parsley. Delicioso!


Tomato, butter bean and chorizo salad
adapted from a recipe by Indira Naidoo

Serves 4 as a side dish or 2 as a main course

400g butter beans, thoroughly washed and drained (original recipe specified 100-150g butter or cannellini beans. I chose to use a whole tin of butter beans as I like them and it makes the salad go a little further)
1 x 250g punnet cherry tomatoes, halved (original recipe specified 20 cherry tomatoes which is a similar quantity to one punnet but too specific for a salad if you ask me!)
1/2 red onion, thinly sliced
handful flat-leaf parsley leaves, roughly chopped
Olive oil, for pan-frying
250 g mild or spicy chorizo, sliced
salt and freshly ground pepper

Sherry vinegar dressing

1 clove garlic, crushed
1 tablespoon red wine vinegar (original recipe says you can also use sherry vinegar)
squeeze of lemon (optional)
1/4 cup extra virgin olive oil (the 1/3 cup specified in the original seemed too oily)
salt and freshly ground black pepper

  • Place the beans, tomatoes, onion and parsley in a bowl.
  • To make the dressing, place all the ingredients in a jar with a screw-top lid and shake to combine. Pour the dressing over the salad and set aside for a minimum of 5-10 minutes for the flavours to infuse.
  • Meanwhile, heat a frying pan over medium-high heat and add the oil to the pan. Toss in the chorizo and cook for several minutes until crispy.
  • Mix chorizo into salad and serve immediately. 
Buen apetito!


Wednesday, August 7, 2013

Cafe Love - 6 Grams


Driving home from dinner with friends near Highpoint on Sunday night, I noticed a warm glow from a shop. With a quick swirl of the head, I spotted tables and shiny red chairs under a big sign that read '6 Grams'. My heart was already beginning to sing when a quick Google search revealed it was indeed a new cafe about to open on Tuesday.


So it was that I drove excitedly back to check it out yesterday afternoon. Now being that it was their first day of trade, I am not going to critique every detail of the experience, especially given that I was rushing to get elsewhere and forgot to take a photo of my order (poached eggs on sourdough toast. I know, gotta get one of the more adventurous options next time but I can't get enough runny poached eggs since not being able to eat them during pregnancy). 

Five Senses Coffee

In any case, it is the freshly fitted out interior and decor that I find satisfying. Its got that industrial vibe that's so popular now, though I'm still thrilled at spotting all the little touches. I love the huge central table with yellow lettering down the legs that nods to a colourful, albeit very different, past. Old traffic signs, vintage telephones and garden walls keep me enthralled while I wait. Not overdone, just enough to keep it interesting. The aforementioned red chairs play a big role in the overall good cheer of the place, as do the yellow tiles splashed on the huge counter at the front. 

Back dining room with peek holes into the kitchen

But what's a cafe without people - namely the service they provide and, of course, the food they put in front of us? To begin, the people here are warm and friendly, happy to chat and looking for feedback to help them improve whatever they can. Manager Vittorio tells me they'll be introducing specials connected to Africa to retain a little of their heritage. I'm sure he sounds Italian and I must look a little confused because he tells me not many people believe a white man with an Italian accent can be African!


Turns out Vittorio is from Eritrea in the Horn of Africa, a country bordering Sudan, Ethiopia and the Red Sea. Eritrea was an Italian colony for about 50 years up to 1941 so that explains the accent! Vittorio spent six years running The Abyssinian, a restaurant in Racecourse Road serving traditional Ethiopian and Eritrean food. 6 Grams is definitely more a modern cafe with a little nod to Africa. With very few options for a caffeine-fix in Maidstone, Vittorio is keen to fill the gap for those who don't fancy sitting in a shopping centre cafe at nearby Highpoint. I, for one, am keen to return to linger a little longer and try something with an African twist. 


6 Grams menu


6 Grams on Urbanspoon

Share

LinkWithin

Related Posts Plugin for WordPress, Blogger...